Monday, April 30, 2012

Painted Lady Butterflies and Ladybugs...


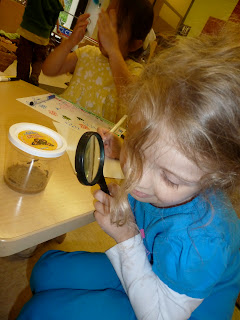
 Our live butterfly garden and ladybug larvae arrived!  Alicia introduced both our butterfly garden and ladybug larvae and discussed with the children the care that both the caterpillars and ladybug larvae would require over the next few weeks.  The children were so excited to have the caterpillars and ladybug larvae in the classroom !  The children were fascinated with every aspect of these new arrivals and were eager to participate in the care of the caterpillars and ladybug larvae. After listening to the  set of instructions that came with both the butterfly garden and the ladybug larvae, we realized that we needed to keep both 'homes' in a spot out of direct sunlight and in a place where we could observe and not disrupt by touching and moving the containers.  We decided that our nature table in the front of the classroom was  a perfect spot. 


A few days had passed and we decided to begin to record the development of both the caterpillars and ladybug larvae through observational drawings.  We felt that recording through observational drawings on a regular basis, we would document the development in a way that was meaningful for the children. Observational drawings  support development and practice of so many important skills; observation skills, comparative skills, fine motor skills, data gathering skills and literacy skills.


We will be reading several books about the  stages and development of both Painted Lady Butterflies and Ladybugs which will facilitate our learning and understanding of this magical process of nature!

Thursday, April 26, 2012

Paper Mache Flowers


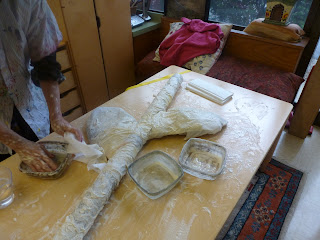
As we  mentioned in our blog yesterday, our children were very interested in continuing with the paper mache art work, and we decided to try the whole process over again in our classroom.  Using heavy cardboard tubes and leaf shape cardboard attachments we worked to construct a stem.  We experimented with making our own paper mache paste by mixing flour, water and glue together.  We were not exactly sure of what the consistency was suppose to be,so we tried several different  mixtures.


The sensory exploration that this project offered was wonderful !  We hope that our stem will dry and if the structure seems to work, then we will make a few more larger than life flowers in the coming days.


Wednesday, April 25, 2012

" Art Is Really, Really Fun and Good For The Community..."

Kailyn announced as she was standing on the table, applying tissue paper and glue to our paper mache flower stems , " art is really, really fun and good for the community".....


The children were excited to begin stage two of our paper mache flowers.  We had waited a few days for the paper mache to dry and today we decided was a great time to begin changing the feeling of this sculpture into a flower.   But how....


We knew we wanted to continue to develop a textural feeling and wanted the children to have as much hands on experience in the process as possible.  Using tissue paper and watered down glue seemed like a perfect medium to introduce and use in this project.  We selected various shades of green, aqua and yellow tissue paper and cut the paper into squares. The children used medium sized paintbrushes and applied watered down glue all over the paper mache structure we had built last week.  The children especially enjoyed the large motor experience of painting in large strokes and moving, climbing and bending as they 'painted' and tissue papered the stem.  The work was collaborative and the children worked together in close quarters respectfully and joyfully.


 The children wanted to continue to work with the tissue paper even when the 'stem' was totally finished.  We decided to use heavy cardboard tubes and create a few more  larger than life flowers.  We  felt that the learning and work in this area just was not quite finished for the children and they would benefit and enjoy continuing the exploration of this process.  We will again paper mache the stem structure later this week and tissue paper the next layer when the structure dries.


Tuesday, April 24, 2012

Art Class


Paul Klee is  a Swedish an artist who creates very elaborate designs in drawings. The children first looked at a painting by the artist and discussed some of the details that this artist used to create his art.  This artist  created sea monsters and used various designs and shapes to create beautiful color inside of the sea monsters.    The children were encouraged to  create their own sea monster and in the style of Paul Klee, use shapes within the body of their monster. The children  were given paper and black markers and drew their own sea monster. They were then offered craypas to create color inside thier creatures.   designs and them used craypas to color in the sea monster.